Showing posts with label Projects. Show all posts
Thursday, October 05, 2017
Cabinet painting...
I love how the sunshine is coming low into the windows with the short, fall days. I had to click this pic of our applesauce in the glowing sunlight of late afternoon. My daughters and one of their friends came and we had a big day of making applesauce a week ago. It was fun and busy with twelve children running hither and yon while we were busy in the kitchen.
I've been painting my lower cabinets for several weeks. My cabinets are only 5 years old, and were put in new in 2012. They were chipping and getting water damaged, especially around the sink, and so I decided it was time to repair them and repaint. My cabinets were all cream like the upper cabinets. I chose to go with Annie Sloan's chalk paint in French Linen for the lower cabinets. I am really happy with the results. It is not perfect, but it is perfect enough for me. After priming and painting them with two coats of chalk paint, I then sealed them with three coats of MinWax Poly-crylic in a flat finish. Traditionally, Annie Sloan paint is sealed with wax, but I chose a hard sealant by using the poly to keep water problems at bay. The poly was a water-based latex so it was easy to apply, clean up, and it dried fast between coats.
I'm linking a great little web page here that shows you all of the Annie Sloan colors as well as what they look like when you apply the dark wax to them. This same site has lots of tips for painting with Annie Sloan chalk paint. However, I do recommend you go to a store that carries the paint and take a look at their samples. I was lucky to have a store nearby that carried the paint AND she had many samples of re-furbished furniture and lamps and mirrors that she used AS paint on. That was great for me because I was leaning towards another color--Paris Gray-- but when I was able to see the French Linen next to Paris Gray, I knew I wanted the French Linen color. I think it looks very homey and warm in my kitchen, and now I'm breathing a sigh of relief that I am DONE! I think it will show less dirt in my very lived-in ranch house too.
Thanks for stopping by!
Monday, August 29, 2016
Retro Cosco high chair refurb #2...
Do you remember my first high chair refurb? If not, click here. It was a garage sale find that OnlyDaughter grabbed for me a few years ago, back when we were getting several grandbabies who could use high chairs. I needed one for my house when the littles came to visit.
I just got another high chair to do a couple weeks ago. I kinda like these projects. JJo bought this high chair from Salvation Army Thrift Store for $2. This one is a fold-up style, not nearly as heavy and sturdy as my first high chair project. The seat and back of this one were covered in a black plastic table cloth. I tossed the covering back on the seat so you could see how really UGLY it was. I tore the chair down and stripped off the foam, but I could not remove the legs because they were riveted on. That meant I had to tape everything before I painted the metal seat. I repainted the chair back and tray too. First I had to sand and strip the rust from the chair's seat and back. The chrome legs and arms were in pretty good shape, but I used Bar Keeper's Friend on a damp rag to remove any rust or dirty spots. I was thrilled at how well it removed rust and cleaned it up. I used Bar Keeper's Friend on the rusty metal seat after I sanded it, and it worked very well on that too. Good stuff!
For painting I used Rustoleum enamel metal primer and white enamel spray paints. I finished the metal parts off with two coats of clear enamel spray paint to preserve the paint underneath.
I ordered Marine Vinyl from Amazon for just $11 per yard (including shipping). This is the stuff you want if you ever want to replace vinyl seats on retro-style furniture or chairs like this. I found that heating it with a blow dryer or heating it in the hot sun, gave it a nice smooth finish while applying it. One thing I learned with this project since I didn't have anything to staple the vinyl to is to use Loctite Permanent Spray Adhesive (professional). This was a life saver for me. Since I knew the original high chair didn't probably have any cushy foam on the seat and back, I decided to use foam board. I traced the seat and back onto the foam board, cut it, checked it, then used a lightweight quilt batting to put on the top of the foam board. Then I laid my chunk of vinyl on top of that, flipped it over, and used the spray adhesive to glue the edges down on the backside. It took plenty of fiddling and readjusting to get it just right, but it was SO much easier than using E6000 which I tried first. I discovered you need the quick drying time of the spray adhesive to make this trick work! Since there was nothing to attach the seat to, I used the same permanent spray adhesive to glue it down to the metal. I stacked a bunch of encyclopedias on top of it while it dried so I was assured of good contact. And it worked.
So, there you have it! Number 2 High Chair Refurb!
I just got another high chair to do a couple weeks ago. I kinda like these projects. JJo bought this high chair from Salvation Army Thrift Store for $2. This one is a fold-up style, not nearly as heavy and sturdy as my first high chair project. The seat and back of this one were covered in a black plastic table cloth. I tossed the covering back on the seat so you could see how really UGLY it was. I tore the chair down and stripped off the foam, but I could not remove the legs because they were riveted on. That meant I had to tape everything before I painted the metal seat. I repainted the chair back and tray too. First I had to sand and strip the rust from the chair's seat and back. The chrome legs and arms were in pretty good shape, but I used Bar Keeper's Friend on a damp rag to remove any rust or dirty spots. I was thrilled at how well it removed rust and cleaned it up. I used Bar Keeper's Friend on the rusty metal seat after I sanded it, and it worked very well on that too. Good stuff!
For painting I used Rustoleum enamel metal primer and white enamel spray paints. I finished the metal parts off with two coats of clear enamel spray paint to preserve the paint underneath.
I ordered Marine Vinyl from Amazon for just $11 per yard (including shipping). This is the stuff you want if you ever want to replace vinyl seats on retro-style furniture or chairs like this. I found that heating it with a blow dryer or heating it in the hot sun, gave it a nice smooth finish while applying it. One thing I learned with this project since I didn't have anything to staple the vinyl to is to use Loctite Permanent Spray Adhesive (professional). This was a life saver for me. Since I knew the original high chair didn't probably have any cushy foam on the seat and back, I decided to use foam board. I traced the seat and back onto the foam board, cut it, checked it, then used a lightweight quilt batting to put on the top of the foam board. Then I laid my chunk of vinyl on top of that, flipped it over, and used the spray adhesive to glue the edges down on the backside. It took plenty of fiddling and readjusting to get it just right, but it was SO much easier than using E6000 which I tried first. I discovered you need the quick drying time of the spray adhesive to make this trick work! Since there was nothing to attach the seat to, I used the same permanent spray adhesive to glue it down to the metal. I stacked a bunch of encyclopedias on top of it while it dried so I was assured of good contact. And it worked.
So, there you have it! Number 2 High Chair Refurb!
Saturday, October 05, 2013
Window project...
(window before)
*Weather Alert: We had 12+" of snow fall yesterday and overnight. The mountains had over 40" of snow. The poor trees are greatly bowed and broken with snow heavy on their branches -- still in leaf. Today will be spent checking on livestock and feeding since grazing is buried. Now back to your regularly scheduled blog post.
.........................................................
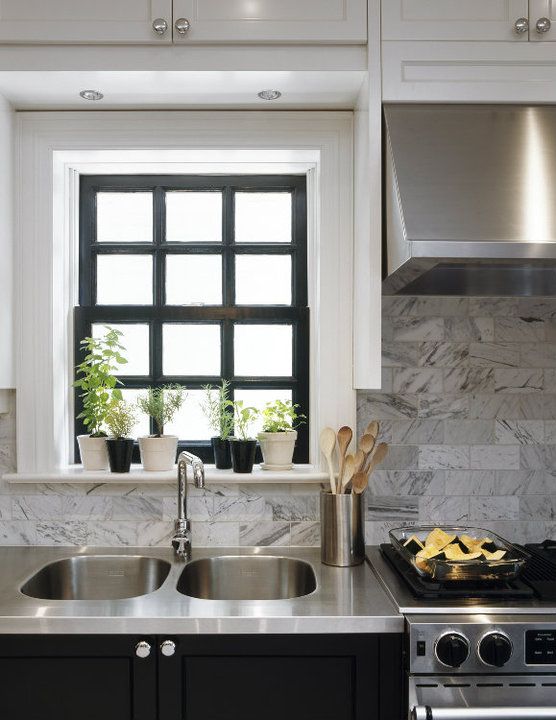
Back in January of 2012 my hubby, dad and sons helped refurbish my 1990s kitchen. This was how it looked when it was done and the wooden window, which I love, always looked a bit out of place to me. I tried lots of window dressings, but it always seemed to just stick out like a cow on a city street. Note the florescent lighting above. It's very dated, I know. It was honey oak. I really didn't want to rip it out and do something totally different because quite honestly, I love the light it provides in my kitchen -- no shadows and lots of light. I thought painting it the same color as the ceiling would disguise it, and it did help. Then one day my CarpenterSon said, "Mom, have you ever thought about painting the grids in the light black?" That got me to thinking and imagining. The next day I painted. I loved it. It got me to thinking about that window. I figured if I liked the light grids painted black, I might like the window grids black too. I saw this photo (below) on Pinterest and loved it and imagined it in my own kitchen. Then I did it. I painted my window.
( After -- window and florescent light)
(After)
I'm pleased. I have another large picture window with the same grids by the dining table. I am considering the same treatment for it, but it's too late in the year to paint it. The temperatures have to be warm enough to really make the paint dry hard and dry well. So in the meantime, I'll just think about it and live with the small, happy progress I made. I found a quote from Nesting Place today that I really love.
...................................................................
We find rest in the incompleteness of the present moment
as we learn to recognize the goodness of what is,
and as we trust that what is needed for the future will be added at the proper time.
~Sally Breedlove Choosing Rest
Labels:
Around Home,
Kitchen Renovation,
Projects,
Weather
Monday, June 03, 2013
High chair refurb...
(High Chair - Before)
I really don't like the modern high chairs because they take up SO much space, and because they are mostly made of plastic. This smiley-face yellow chair is one sturdy piece. I have never refurbished a metal high chair before so I did some research before I plunged in to the project.
I used Rustolem Clean Metal Primer spray paint followed by two coats of Rustoleum Gloss Protective Enamel on the tray, seat frame, and foot rest. I was concerned about how safe a spray paint enamel would be on a child's tray, so after I stenciled "EAT" on it in sunny yellow, I went over it with three coats of water-based polyurathane. I'm hoping it protects the enamel paint on the tray and the food that comes in contact with the tray surface. I figured if poly is good enough for a wood table, it's good enough for a metal tray.
After
re-assembling the chair, I sewed a belt for it so we
could keep wiggly children in. I used a D-ring on one side of the belt to cinch it.
Here it is, all shiny and clean and ready for Little Eaters!
Over there
Is Baby's chair,
His silver cup,
And silver spoon...
Baby's supper time
Comes soon.
~Baby Looks by Eloise Wilkin
Wednesday, June 27, 2012
Hot pink sun...
A hot pink sun slides over the REA wires above our hay field tonight. Pretty, isn't it? I think so, but the reason the sun is hot pink is not a very pretty thing. There are forest fires raging all around us, and the sky is a perpetual smoky-gray haze. It has been so terribly hot these past days and the weather man promises even more heat for the rest of the week. At least the gray haze keeps the sun from beating down in full strength, but the heat continues to penetrate.
The haying is all done except for a little cutting along roadsides and feed grounds. We are thankful for what we got. Some ranchers won't get any hay put up this summer. Too dry.
We are laying water lines this week out in a couple of the summer pastures. The stock ponds and reservoirs are so low that it is very likely we will run out of water for the cows unless we can pump water into stock tanks. Hubby rented a trencher and backhoe from Monday through the July 3rd. My parents came out to help. The menfolk are out trenching, gluing pipe, setting tanks, and burying water lines. Today I helped them for a few hours, but there were also the livestock to drive out to. We try to check on the cows, sheep, steers and bulls every day, making sure they are not hurt or sick or bogged in the mucky stock dams and checking to see that our cows are in their proper pastures and not across the fence in the neighbors' pastures. A couple of the neighbor's bulls were in our cows today so they were put back on their own side of the fence. Have you ever heard the line from the Robert Frost poem The Mending Wall? "Good fences make good neighbors." When you have livestock, it's true. So true.
There is always work to do, but I'm looking forward to some Summertime easy living, aren't you? I want a little time to sew and embroider and to do some lawn chair-sitting in the shade with a good book and a tall glass of iced coffee. My book-reading is sparse right now, but I am enjoying snippets of Gladys Taber's Stillmeadow Daybook (June) and I'm catching up on my Better Homes and Gardens and Country Living mags. I haven't started my summer traditional ice cream-cone-a-day yet, but I did make some strawberry-yogurt popsicles and put them in the freezer! How do you celebrate summertime?
The haying is all done except for a little cutting along roadsides and feed grounds. We are thankful for what we got. Some ranchers won't get any hay put up this summer. Too dry.
We are laying water lines this week out in a couple of the summer pastures. The stock ponds and reservoirs are so low that it is very likely we will run out of water for the cows unless we can pump water into stock tanks. Hubby rented a trencher and backhoe from Monday through the July 3rd. My parents came out to help. The menfolk are out trenching, gluing pipe, setting tanks, and burying water lines. Today I helped them for a few hours, but there were also the livestock to drive out to. We try to check on the cows, sheep, steers and bulls every day, making sure they are not hurt or sick or bogged in the mucky stock dams and checking to see that our cows are in their proper pastures and not across the fence in the neighbors' pastures. A couple of the neighbor's bulls were in our cows today so they were put back on their own side of the fence. Have you ever heard the line from the Robert Frost poem The Mending Wall? "Good fences make good neighbors." When you have livestock, it's true. So true.
There is always work to do, but I'm looking forward to some Summertime easy living, aren't you? I want a little time to sew and embroider and to do some lawn chair-sitting in the shade with a good book and a tall glass of iced coffee. My book-reading is sparse right now, but I am enjoying snippets of Gladys Taber's Stillmeadow Daybook (June) and I'm catching up on my Better Homes and Gardens and Country Living mags. I haven't started my summer traditional ice cream-cone-a-day yet, but I did make some strawberry-yogurt popsicles and put them in the freezer! How do you celebrate summertime?
Saturday, October 29, 2011
Jack-0-lantern tip....
I've been setting out a few of my Halloween things and had this good idea for stabilizing candles in your jack-o-lantern jars. Use Epsom salts (or any other salt). I thought of this idea after remembering this cute tip for holiday jar candles. I have used mason jars with Epsom "snow" for Christmas, but never thought of using it for Halloween.
When the kids were all at home, we made these cute jar-o-lanterns. Martha Stewart had this idea on her site and we liked it so much we gave them a try. They were quite simple to make. We used orange spray paint on the inside of the jars and printed out Martha's stencils for the faces. Some of the more creative kids designed their own faces. In her how-to instructions, she says to print off the jack-o-lantern faces on adhesive paper, but we didn't have that. Instead, we printed off the faces on regular paper, then put masking tape on the jars where we wanted our faces to be. We cut out the paper faces and taped them onto the masking tape part or drew the faces onto the tape with a Sharpie. When we were happy with the face placement, we took an Exacto knife and cut away the eyes, nose, and mouth and then painted the open parts with glossy black paint. Let the paint dry and peel away the tape. You can use the jars to hold treats or add a tea light inside like we did. I put Epsom salts in the bottoms of our jars to raise up the candle a bit and to keep the spills and melting wax from melting onto the jars.
Tonight Skelly is peeking out from the picture window and Scarecrow is welcoming visitors and trick-or-treaters by the front door. Our only trick-or-treaters will be the next door neighbors -- the grands. Now I'm off to bake up some Halloween Sugar Cookies.
Happy Halloween!
Sunday, October 16, 2011
The Leatherman...
How many women do you know that you can call Super Woman? How many tools do you know called a Super Tool? I only know a woman or two that I might call Super Woman, but there's only one tool called The Super Tool, and that is the Leatherman. Some folks call this special tool a Swiss Army Knife, and it is very similar, but I think the Leatherman is a lot tougher and sturdier than most. I've had this ol' workhorse in my junk drawer for years and years. It's actually Hubby's, but it's in the drawer for all of us to use.
Today I used the Leatherman for a small project for a sweet Peach. She and I had been digging in her mommy's garden and the gosh darn handle broke right off her Little Girl Shovel. I thought Peach might just burst into tears then and there, but I told her I would fix it for her while she and her family were away visiting her Nana and her cousins for the day. ~smile~
The first thing to do was to saw off the jagged end of the wooden handle. The Leatherman has a really sharp saw blade that whizzed right through.
Next I needed to whittle off some of the sides so the handle could slide all the way down into the metal shaft. That was easy to do with the knife blade.
Lastly, when the handle fitted perfectly into the shaft, I needed to put a couple screws into it to hold the handle securely onto the shovel. The Leatherman had a Philips screw driver that handled the job. Now the shovel is fixed up and Miss Peach thinks I'm SuperGram!
You, too, can be Super Gram, Super Mom, Super Wife, Super Girl or Super Man!
All you need is the super tool.... The Leatherman. Getchya one!
Today I used the Leatherman for a small project for a sweet Peach. She and I had been digging in her mommy's garden and the gosh darn handle broke right off her Little Girl Shovel. I thought Peach might just burst into tears then and there, but I told her I would fix it for her while she and her family were away visiting her Nana and her cousins for the day. ~smile~
The first thing to do was to saw off the jagged end of the wooden handle. The Leatherman has a really sharp saw blade that whizzed right through.
Next I needed to whittle off some of the sides so the handle could slide all the way down into the metal shaft. That was easy to do with the knife blade.
Lastly, when the handle fitted perfectly into the shaft, I needed to put a couple screws into it to hold the handle securely onto the shovel. The Leatherman had a Philips screw driver that handled the job. Now the shovel is fixed up and Miss Peach thinks I'm SuperGram!
You, too, can be Super Gram, Super Mom, Super Wife, Super Girl or Super Man!
All you need is the super tool.... The Leatherman. Getchya one!
Labels:
Around Home,
Before and After,
Good Things,
Projects
Friday, September 16, 2011
Out and about and a Monarch Paramount....
I drove to town today to do some grandmothering (I don't like the word babysitting) with my little Cuppycake. These are a few pictures of the homesteads, old and new, along the drive there and back. There used to be a very small town just 6 miles down the road from our ranch where the gravel meets the pavement. I know that part of it perished by fire years and years ago, and the rest of it disintegrated from the dwindling rural population. Albion had a post office, a store, a livery, a grade school, a community hall and a few homes. This was one of the old sheds from that small town. The school and hall still stand.
Our neighbor passed away a week ago. He has lived in our community all his life and attended the grade school just a mile down the road. This is his ranch alongside the highway. We don't know what will become of it since he had no family of his own to pass it to. It's a beautiful ranch along the river.
Isn't this picturesque? This old set of corrals and barn have been here a long, long time. I asked Hubby if he knew who had it or if there was a story behind it. He said he didn't know, but his dad was sure to know. The small river nearby sometimes floods right up to that bank that is cut out next to the corrals. There are beautiful finger buttes in the background.
I'm considering hauling this old Monarch Paramount range home. It would need some cleaning-up, some repairs and some renovating, but I think it would be lovely in my country-ranch kitchen someday. I have been poring over magazines, books, and web pages trying to get just the right ideas for remodeling our kitchen. Hubby decided for our 30th anniversary that we should give ourselves a newly renovated kitchen since it has always been the hub of our family life. Every holiday and every gathering when all the kids come home with friends and husbands, wives, and girlfriends, and grandchildren, we find that the kitchen is literally stuffed with people standing around talking. We want a bit more room for family to participate or just yak over the counter and into the kitchen where all the bustle is.
Hubs and I have lots of ideas, and that is sometimes the difficulty of this project, for we must narrow down the good ideas to just a few that will fit into our space. Before the actual work is to be done, there is a pile of work just in the planning. It's fun, but it's a job too. So many choices. So many decisions. So many little details. Maybe one of these days I'll share some picture-ideas here with you. If any of you have ever remodeled your kitchen, I am open for suggestions that start with... "The Best Thing we ever did was..." or "The One Thing I'd do in my new kitchen is...."
I hope you'll share.
Friday, August 26, 2011
The new old chair and a cake....
She got a coat of primer and a coat of semi-gloss white, and
then a punch of color on her seat with laminated fabric, Summer Totem,
by Anna Maria Horner.
Here's the back. I love the curvyness of this chair.
It cradles your back when you sit in it.
Love, love, love.
And now for another summer love...
Chocolate Zucchini Cake
2 c. sugar
3 eggs
Beat these two ingredients until fluffy.
Add dry ingredients:
2 1/2 c. flour
1/2 c. cocoa
1 t. salt
1 t. baking soda
1/2 t. baking powder
Next add wet ingredients:
3 t. vanilla
2 c. peeled, grated zucchini
1/2 c. buttermilk (or sour milk)
Mix batter until smooth-ish.
Bake at 350* for 30-40 minutes or until toothpick inserted comes out clean.
Mom's Topping:
After baking, sprinkle on chopped walnuts, semi-sweet chocolate chips,
and a little bit of sugar.
Put back into the oven for a minute or two.
Eat with a big scoop of ice cream.
Heaven will have this cake.
Wednesday, April 06, 2011
Family photo gallery wall....
I've always had the "Wall of Fame" in our upstairs hallway and after taking everything down to repair and repaint a few weeks ago, I decided to update it and add in some old-time family photos. Initially, I was only going to do black & white photos, but I decided to add a splash of color here and there with the framed fall leaves and a few colored photos. The old ranch branding irons add a bit of nostalgia (we use electric branding irons now). I made the stair rail a few years ago from a dead cottonwood branch that I found on the ranch. I sanded it and sealed it with a polyurethane finish. I did not pre-plan my gallery wall as some do, but just started in and pounded nails as I went along. I had a lot of fun with this project and look forward to adding to it as our family expands.
This photo is taken from the top of the stairs looking down. The blank frame is securing a place for a senior picture of our youngest. If you are considering doing a gallery wall, you might enjoy looking around at the Inspired Room where there is a Gallery Wall Party happening!
Monday, March 21, 2011
Just Do It!
It's spring.
It's time for a change in the seasons.
Something happens in my head about this time of year and I want change inside my home as I see the changes happening outside. I want light, fresh, clean, new.
This week, I was ready for a change in our bedroom.
My motto is Nike's --
Just do it!
The pic above is the BEFORE of our gold bedroom.
And this picture is the light, fresh, clean, new AFTER picture of our bedroom transformation. I covered the walls with Valspar's Macadamia and the ceiling got a coat of Bran Muffin. My son, J, helped me pull off the all trim around the windows and doors and the base boards, then I sanded, stained, and varnished the wood in a rich mahogany to reflect the red stain of our bedroom furniture.
The paint almost takes on pink hues in these pictures, but it does not look pink in our room. Must be the lighting. I really like my branch on the wall. It's a hunk of honeysuckle vine that I pruned last year. I knew when I trimmed it off, I would find a good use for it.
S., our college student, made this wonderful papercutting in his art class. His tools were a piece of 18x24" sketch paper and an Exacto knife. That's it. (He got an A!) He knew I'd love it, and I do. I think I'll put a brown background paper behind it instead of the grey. It is now hanging on the wall with some vintage bird pictures I printed off from The Graphics Fairy and feathers that I've picked up in the pasture. I tend to collect feathers. I don't feel that I'm completely finished with our room yet. I am looking for the perfect, funky little night stand for my side of the bed and I'd like to add some turquoise accents. For the now, I'm so happy.
Subscribe to:
Posts (Atom)